Guild of Lost Lore · Encounter Dossier SL-E-003
The Crypt Hides a Deeper Secret
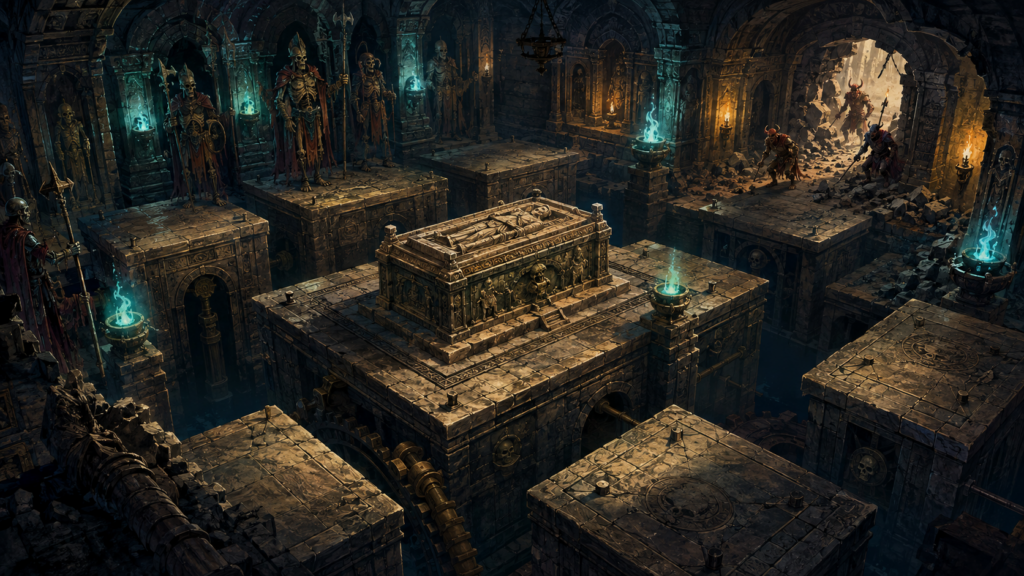
Beneath a roof of fractured stone, an ancient defense engine grinds awake. Floor panels climb like towers or plunge into lightless pits while the dead protect a sealed sarcophagus—and fiendish trespassers race the adventurers to whatever lies inside.
Party
4–5 characters, level 5
Mode
Combat, hazard, rival faction
Run Time
60–90 minutes
This encounter works best when it is not treated as a room full of enemies waiting to be cleared. The crypt has three active sides: its undead wardens, a fiendish recovery party, and the characters. Each wants control of the sarcophagus, and the moving floor keeps every plan unstable.
What the Characters See
The doorway opens onto a hall fifty feet long and thirty feet wide. A carved sarcophagus rests at its center. Hairline seams divide the floor into great square slabs, and broken burial niches gape from both walls. As the first boot crosses the threshold, blue-green flames race from brazier to brazier. Somewhere below, stone teeth catch—and the entire floor shudders.
Room Features
Dimensions. The chamber is 50 by 30 feet. Treat it as fifteen 10-foot-square floor panels.
Sarcophagus. The central stone bier is 5 feet high and provides three-quarters cover.
Light. Spectral braziers provide dim light. Extinguishing one requires an action and a successful DC 14 Arcana or Religion check.
Reading the Danger
DC 13 Perception. Notice the seams and old scrape marks before entering.
DC 15 Investigation. Predict which four panels are currently primed to move.
DC 15 Arcana or Religion. Recognize that the braziers, floor engine, and sarcophagus ward are parts of the same system.
The Shifting Floor
On initiative count 20 of rounds 2, 4, and 6, the crypt rearranges itself. Choose or roll for four different panels, then roll 1d6 for the movement.
1–2 · The floor rises. The chosen panels climb 10 feet. A creature standing on one may ride it or use its reaction to step into an adjacent safe space.
3–4 · The floor drops. The chosen panels fall 10 feet. A creature on one makes a DC 14 Dexterity save, moving to an adjacent safe space on a success. On a failure, it falls, takes 1d6 bludgeoning damage, and lands prone.
5–6 · Counterweight surge. Two panels rise and two drop. The GM chooses the split before creatures make their saves.
Limit: A panel can only occupy three positions: 10 feet below the floor, level with it, or 10 feet above it. If a result would move it beyond that range, it returns to floor level instead.
The Three-Sided Conflict
Crypt Wardens
One wight and three skeletons defend the bier. The skeletons hold narrow approaches while the wight uses raised panels as firing positions and drains isolated foes.
Fiendish Intruders
One cambion and two quasits entered through a collapsed passage. They want the relic, not a fair fight. The quasits scout invisibly while the cambion studies the seals and bargains when useful.
The Adventurers
The party can defeat both factions, cooperate with one, steal the prize during the confusion, or reseal the tomb. Reward plans that engage with the room instead of requiring a total rout.
Running the Encounter
For a broader framework for environmental pressure, changing conditions, and timed objectives, read The Essence of Good D&D Combat Encounters.
Opening beat. The undead animate when the spectral flames ignite. The fiends remain concealed and observe the party’s response.
Round 2. The floor shifts for the first time. A quasit uses the disruption to approach the sarcophagus or interfere with a vulnerable character.
Round 3. The cambion reveals itself. It offers a temporary bargain if the party is holding its own; otherwise, it starts breaking the sarcophagus ward.
Round 4 onward. Alliances become liabilities. The wight prioritizes anyone touching the bier, while the cambion tries to escape with the relic rather than fight to the death.
Opening the Sarcophagus
A creature adjacent to the bier can use an action to attempt a DC 15 Arcana, Religion, or thieves’ tools check. The party needs three successes before two failures. Each failure releases a pulse of grave-cold energy: creatures within 10 feet take 2d6 necrotic damage, or half on a successful DC 14 Constitution save.
Alternative: Extinguishing all four spectral braziers suppresses the ward for one round, granting advantage on the next attempt.
What Lies Within?
Choose a reward that connects the crypt to the wider campaign. The sarcophagus might contain a saint’s weapon wrapped in burial cloth, a command seal that controls other ancient defense engines, a map etched on sheets of hammered silver, or the preserved testimony of someone history deliberately erased.
For a sharper reversal, the “relic” is the crypt’s prisoner. Opening the bier frees an articulate undead oracle whose knowledge is valuable, dangerous, and incomplete. The cambion’s orders were to recruit it—not destroy it.
Difficulty & Scaling
More forgiving. Use two skeletons, delay the first floor shift until round 3, and have the cambion negotiate rather than attack.
Standard. Use the encounter as written. The cambion pursues the objective first and only commits fully if cornered.
More dangerous. Shift the floor every other round after round 2, allow the quasits to extinguish braziers, and have the cambion enter the battle immediately after the first seal failure.
GM note: A cambion, wight, skeletons, and quasits attacking together can overwhelm a level-5 party. The standard version is balanced around competing objectives and staggered participation, not a single coordinated enemy team.
Carry the Crypt Forward
The chamber should leave evidence that it belonged to a larger network: a repeated funerary emblem, numbered floor-engine parts, or directions to a second sealed site. Whether the party takes the relic, destroys it, or loses it to the fiends, the forgotten builders now have a visible footprint in the world.
Adventure seed: Three nights later, one of the floor panels begins moving beneath a building far from the crypt. Explore more encounters from the Guild of Lost Lore.
Discover more from The Stygian Labyrinth
Subscribe to get the latest posts sent to your email.